Support the Wood Filler with a Small Board during Application. Place some wood filler slightly darker than the color of the wood in the hole and feather out the edges with a putty knife.
Mdf Vs Wood Kitchen Cabinet Doors Designing Idea
Remove the screw and hardware.
How To Repair Wood Feathering On Kitchen Cabinet Edges. When smooth it can. Here you have to entirely peel the old paint from the cabinet so get a bare base. These flexible plastic cabinet door edges ca.
Dip toothpicks in glue jam as many as you can into the hole and break them off. Fill the divot or large chip with the glue filler and allow to dry. Ask yourself if you are confident or experienced enough to handle such an undertaking.
You already know that the old paint is not good and so it is peeling. At other times you will need to plane the wood and cut off a piece of replacement wood. With a screwdriver unscrew the hinges from the cabinet face.
There are different types of kitchen cabinets wood types and finishes which means that varying techniques are also applied. However since this side of the cabinet wont be exposed we decide to skip the staining. Mix thoroughly cup of oil canola oil is perfect and cup of vinegar white or apple cider.
Step 5 Shape the Fully-hardened Resin Wood Filler. Melamine is a laminate used on cabinets. It is hard and scratch resistant.
You might just need to add some wood putty to the edge and smooth it out. To prevent that from happening use Minwax Wood Cabinet Cleaner in the convenient trigger-spray bottle. Once dry you can sand this and reapply the paste if needed.
Using laminate filler in a matching color such as SeamFil can make the crack or chip less noticeable. Match the cabinet touch up paint to the cabinet to cover the wood glue filler and blend the repair into the bank of cabinets. Now we could re-stain this cabinet and our surgical scar would be barely noticed.
Cut the edging tape down. Rebecca Galbraith-Rankins You can sand to smooth it out then I mixed Elmers wood glue and water to make a paste and applied it over the raised and rough area. However over time through repeated use accidents or misuse cracks or chips can occur.
Step 4 Cut away Excess Resin Wood Filler with a Utility Knife. Line the bottom of the edging tape with the bottom edge of the raw wood edge on cabinet door. Heres a quick remedy.
When the wood filler dries it turns a chalky white. Once the door is off the cabinet you can then remove the hinges from the cabinet door. Over time these deposits will soften and damage even the strongest of wood finishes.
There is a level of experience required in handling such repairs. Step 3 Apply the Activated Resin Wood Filler Quickly before It Hardens. Allow the area to dry for 24 hours.
Apply contact adhesive to both the raw edge of the cabinet door or drawer and the back of the edging tape. Kitchen cabinets seem to be a magnet for cooking oils grease and food especially around knobs and hardware. Sand the area lightly with a rough grit of sandpaper.
You can also repair scuffs by rubbing them with a walnut. The second step here is to sand the surface of the cabinet. Sand around the edges until the area is smooth and even with the rest of the cabinet faade.
Fill holes with toothpicks and glue If a screw turns but doesnt tighten the screw hole is stripped. If the surface would not be clean and smooth then the paint would not set properly. SeamFil in a color matching your cabinets.
To repair fairly minor damage just use this all natural recipe to restore your wood. Take down the door remove the knob and wash the surface with detergent in warm water to remove the greasy smears common on kitchen surfaces. Step 2 Mix the Catalyst and Wood Filler Resin before Repair Application.
Before doing the repairs assess the extent of the damage. Use a chisel to scrape out any remaining rough edges of the splinter. Follow application instructions and your wood pieces will be looking as good as new in no time.
These flexible plastic cabinet door edges ca. Leave to dry for about 5 minutes. I then sand off the excess creating a smooth surface on the side of the cabinet.
Diy Guide On How To Paint Your Kitchen Cabinets Zameen Blog

Peeling White Thermafoil Cabinet Door And Drawer Front The Home Depot Community Thermofoil Cabinets Laminate Kitchen Cabinets Laminate Cabinets

Name Your Favorite Texture For Cabinets In The Kitchen Www Cabinetcity Net Cc C Coastal Kitchen Cabinets Types Of Kitchen Cabinets Kitchen Inspirations
How To Prep And Paint Kitchen Cabinets


Zambukka Melamine Kitchen Melamine Kitchen Kitchen Design Kitchen

2019 Home Design Trends Home Decor Kitchen Kitchen Design Home Kitchens

Pin On Schrank
How To Prep And Paint Kitchen Cabinets


Pro Tips On How To Prime Paint Your Kitchen Cabinets Cabinet Doors N More

Chagny 1400 Small Wooden Shelf Kitchen Cabinets Kitchen

Open Concept Kitchen Budget Kitchen Remodel Wood Kitchen Cabinets Upper Kitchen Cabinets

Alder Wood Kitchen Cabinets Alder Wood Kitchen Cabinets Kitchen Cabinets Light Wood Wood Kitchen Cabinets
Mdf Vs Wood Kitchen Cabinet Doors Designing Idea

Cheap And Creative Diy Home Decor Projects Anybody Can Do 7 Diy Wood Counters Home Remodeling Home Diy

1m 2m Waterproof Wood Vinyl Wallpaper Roll Self Adhesive Contact Paper Doors Cabinet Desktop M In 2021 Wallpaper For Kitchen Cabinets Wood Vinyl How To Waterproof Wood

Old Oak Kitchen Design Kitchen Cabinet Design Kitchen Renovation

Cabinets Kitchen Wood Working Wood Plans Wood Projects Wood Tools Tools For Woodworking Woodworker Corner Cabinet Solutions Corner Cabinet Cheap Cabinets
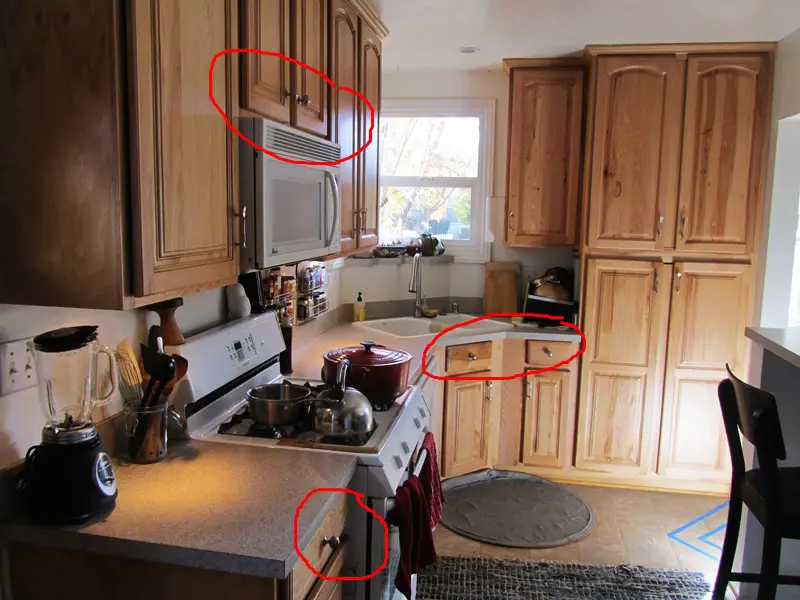
Lovely Imperfection How To Fill Holes In Cabinet Doors Lovely Imperfection

Kitchen Cabinet Tapered End Open Doors Kitchen Cabinets Kitchen Cabinet

